Hey, this is a little later than I'd like to be posting but my boyf is suffering from glandular fever, jaundice and now a horrible rash so I've been looking after him/been at the hospital and doctors so I've finally had a chance to do my nails as he is starting to recover....we hope :)
Anywho Illamasqua Kink was such a pain to remove, it stained my cuticles as I was removing it boo for nasty cuticles! I put this pink Nails Inc on for something simple to cover up my stains but it ended up needing 4 coats!! It was very streaky :( I don't like the colour, it's too barbie pink :P.
As the Vday is round the corner (so it New York!!) I decided I could do a really simple mani before I take this colour off. I saw this nail art in this months Company magazine and it was created by the nail genius The Illustrated nail. Of course the models nails were a lot shorter than mine so I have adapted it to look good on my nails but it looks great on short nails!
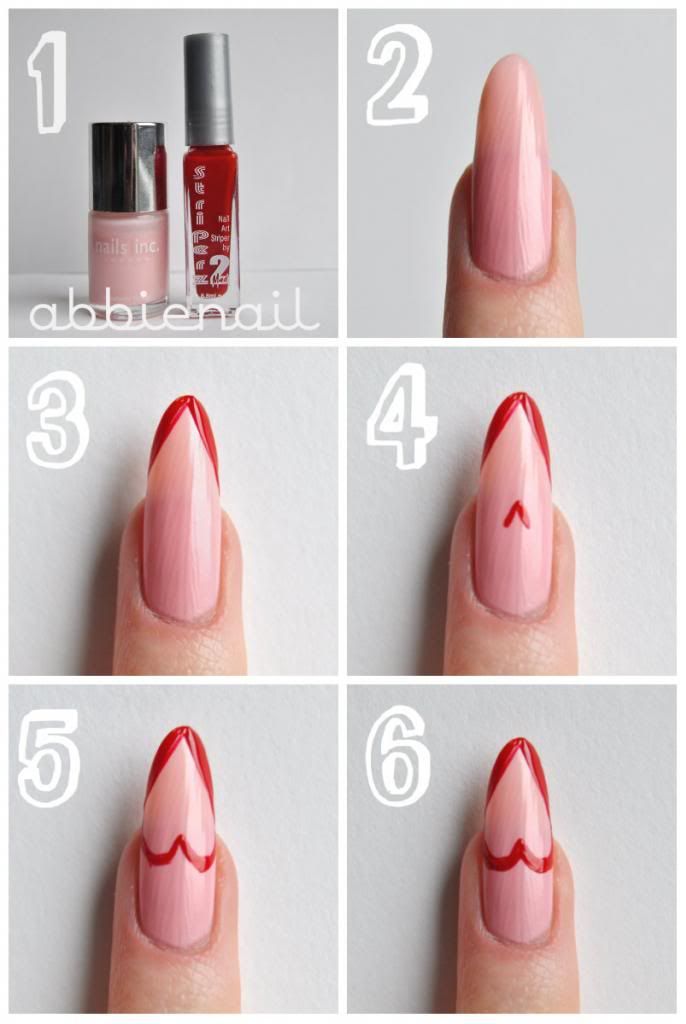
1. You only need one base colour and either a red striper or a striping brush and red polish (you could use a nail art pen if you have one, I prefer the clean edges that a striper gives) Hope I'm spelling striper right.... ;)
2. Paint your base colour and let dry fully.
3. Using your striper (or whatever you're using) make a line from the tip in the centre to the edges of your nail, depending on how pointed you want the hearts tip to be (mine are quite sharp) will determine how far up your nail the lines go.
4. Above the two lines, on shorter nails (read normal non talon length) this should be just under the base of your nail, draw an upside down v.
5. Join your v to the two exisiting lines with a curved line on either side. Try to keep the inner side clean, it doesn't matter if the outer edge is a bit wobbly as you'll be covering it up.
6. Neaten the outer edge, making them the same thickness as the bottom lines or colour all the way to the base of your nail. You should now have really cute heart outline nails! Yay :)
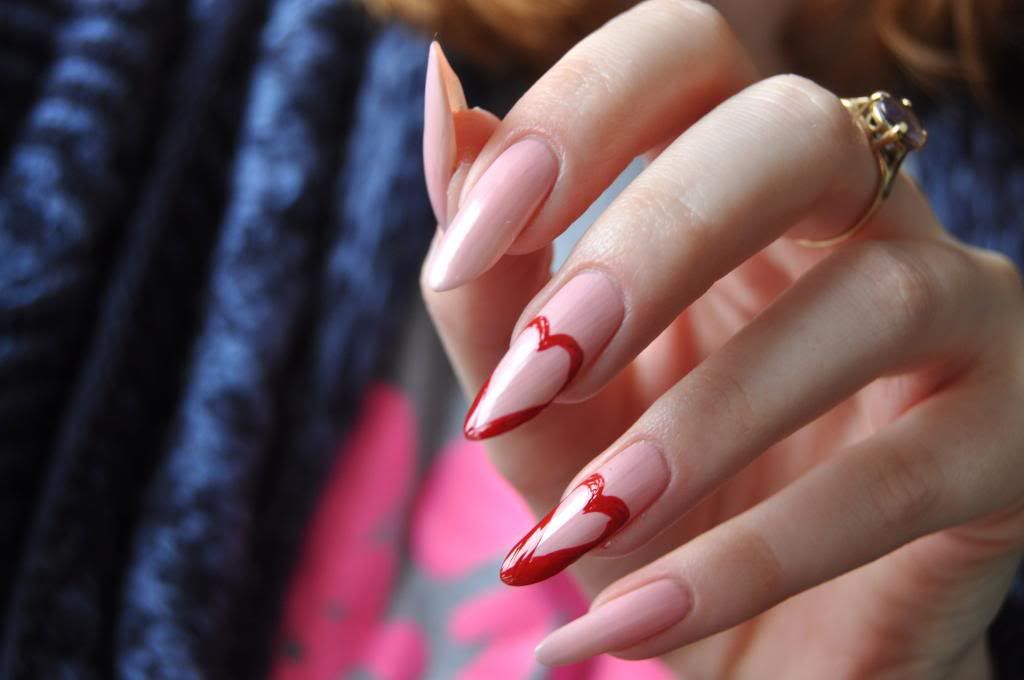
I did two versions, the one on my ring finger is just a thicker version of the above. It looks great on short nails as it covers the whole nail rather than 3/4s, it's super cute for vday and it's quick and simple too :).
Sorry about my horrid ridges! Not even 4 coats of polish can tame them :(.
I've started to think of my NY nails.....eeeee
Let me know if you're going to give it a go! I'll pop these onto my tutorials page :)


6 comments:
Very cute! Thanks for the tutorial!
Looks great on your nails! I'd love to see the inspiration behind it! I'd try this but I think I would need pointy nails to pull this off.
Fabulous!!! :D I might totally have to steal this idea. ;) Hope your boyfriend starts getting better soon. I know how bad that sucks. :( Don't forget to take care of yourself as well.
So cute! Loved the colors =)
Xo,
http://missycosmeticos.blogspot.com.br
Super cute. Thanks for posting a tutorial.
Beauty Makeup Addict
Wow, this looks so awesome! I'd love to try it out but I don't think my nails are pointy enough >.<
I completely sympathise with the boyfriend having glandular fever - before we were married, my husband had it (we think I gave it to him!) and it was awful. Hang in there! ♥
PS: I've nominated you for the Liebster award - you can see my post about this at my blog (here). (this isn't spam, i promise! >.<)
Post a Comment
I always read and smile at all comments and I try to reply when I can! Thanks for reading :)