Saturday, 29 September 2012

African print inspired nail art

I know that I am the worst blogger at the moment, and I'm going to blame that on my boyfriend, we only have one broadband cable in the flat and he's on it all day playing online games :( also my iphone is refusing to charge up so it's kind of dead :(.
But I'm here now! I might do a few swatches today so I have stuff to post whilst I'm wearing nail art. Which is what I have to show you today, I should have posted the other day but I wasn't happy with the photos I took, I'm still not but hey ho.

I was inspired by african prints on clothing and fabric as they are such gorgeous patterns and make perfect nail art. I started with a base of Sinful Colors Unicorn which is a soft yellow which took FOREVER to dry and made my nail art life hell :P. Then with a black striper I made crossing lines then I made semi circles with two kikos using a small nail art brush. once it had all dried I did the black detailing with a nail art pen.

 Right hand - index and ring are my favourites
Left hand- I'm not sure about any of these
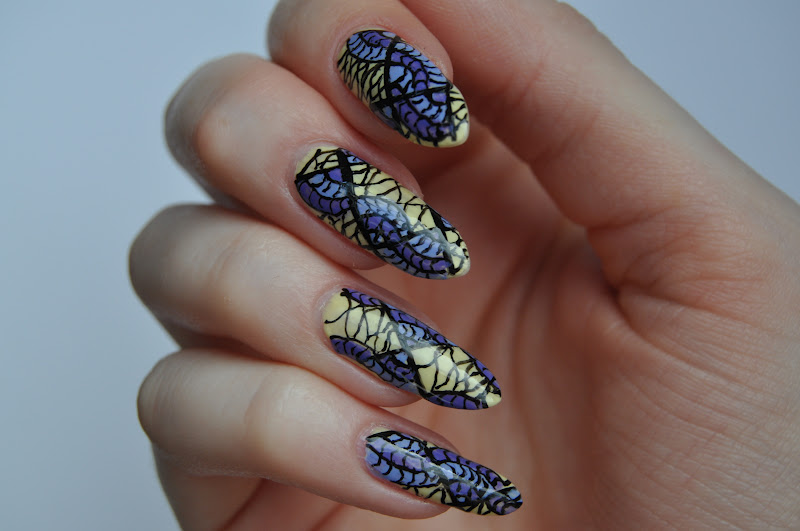
Woah look at that thumb nail! Lethal lol. I like the original pattern waaaay better than my interpretation of it, I did the crossing lines too close so the semi circles were too close and look like snakes or something instead of the fan like shapes that they are meant to look like. I guess they're okay no one else knows what they're meant to look like :P. I wanted to try making a different shape other than square with the brush, it went okay I think. Everyone at uni liked them so I guess that's good but I just can't like them, saying that I've had them since tuesday maybe! Wow that's a long time :O.
 
I don't know what to change them to........any ideas? Something cool obvs ;)

Sunday, 23 September 2012

Heart tip nail art

From today I am posting from the flat at uni so my posting will either be more sporadic or more regemented LOL it depends whether the work level is higher and harder or if I get into a good routine of work then nail painting so we'll just see I guess ;).

This mani is something I've been wanting to do ever since I grew my nails out but I never had the right nude until I found Barry M Nude. Nude is a sheer....nude colour :P I thought it'd be horribly sheer but actually it was really buildable and two coats makes a good coloured wash. I used three for this mani as I wanted the extra depth of colour but you can still see my nail underneath. My mum has been wearing Nude on her short nails and it looked so nice and clean so if you can I'd definitely pick this one up.
After it had dried I got my mini orly in red and simply painted two lines and then smoothed the arches out and that was it!

Action shot ? ;) I thought it'd be nice for you to see the nails in real life instead of just posing with a bottle :P. This is so easy to do and looks so cute, it has a lana del ray feel to me, she has some great nails :).
These look a lot better in person than in the pictures, trust me!
Good news about the pixel nails, Tipsy Zine has recieved them, I saw a picture of all the nails on their instagram, I cannot wait for it to be published!!

See you all soon!

Tuesday, 18 September 2012

Gingham nail art and tutorial

I was meant to get this out last night but I was just too tired so here it is now!
Like I said it's very unseasonal (for us in the UK at least) but it's super cute and looks really cool :). I'll show you the finished look then I'll give the tutorial.
I figured posing with a gingham bow would work ;) my sister made that bow btw....anyway here we go...

All you need is, one white polish, two of the same colour, one lighter and one darker, I used Models Own Lilac Dream and Models Own Purple Poppy. Also you will need one nail art brush either a striper or just a medium length square edged brush and some acetone/remover to keep cleaning the brush with.           
                                                                                                                                                                                 
Step One
Paint all your nails white, two coats should do it, they don't have to be perfect as most will be covered. Then use a fast drying topcoat to ensure a smooth and dry finish.
 
Step Two
Once all nails are dry, starting at either edge of your nail with a tiny bit of nail polish on the nail art brush/striper, slowly bring the brush to the tip of your nail, go over it again if it's to thin or wobbly, you need a nice edge. Repeat across the nail, depending on the width of your nail you should be able to fit three thin stripes or two medium sized stripes. Again you'll need two coats on the stripes.
 
Step Three
Once the vertical stripes are dry, you can start to do the horizontal lines, try to make them the same width as the vertical lines and space them out so that when the lines cross they make white squares, it doesn't look as good if you have rectangles :P.
 
Step Four
Once the horizontal lines are dry, take your darker shade and dap a tiny bit onto the nail art brush/striper and where both lines meet create a square out of the darker colour, this is quite easy as the lines you've already created help keep the darker colour in a sqaure shape. I've shown you here just on the one side to show you what I mean.
 
 
Step Five
Continue making the squares on all cross points on all nails. I only did one coat as I didn't think it needed a further coat as it's a darker colour. As you see my lines and squares are not perfect but it doesn't matter.
 
Step Six
Once everything is dry seal with a very glossy topcoat and you're done. The topcoat really helps to disguise any blips and uneven polish.
 
So I hope you found this tutorial helpful, I'm sure there are other ways to do this but this is the way I did it and it was pretty easy the only difficulty was creating straight lines without a proper striping brush, the only thing is that it is very time consuming and you might get a sore back :P. My right hand turned out pretty good too, the pattern is bigger on my right hand but it still looks good :)
 
 
 Let me know if you try this! I'd love to see your results, I think it'd look so cute with a different colour on each finger :)


Saturday, 15 September 2012

Dior Amazonia swatches

I am saying that this is the start of autumn in terms of my nail polish wearing, it has turned colder and windy and the days are gradually getting shorter (and I'm back to uni next saturday!!) so the jumpers are officially out of the cupboard. And so are the dusty cremes and jewel tones that only autumn can inspire! So the first of my autumnul colours is Dior Amazonia.
I got it for my birthday off my sister :) and is a lovely dark khaki creme with the Dior hidden shimmer. Perfect in two coats as to be expected from Dior with the tapered brush which makes application so easy.
This is the only colour accurate photo I took, you get an idea of how dark and delicious it is ;) it's perfect for cooler weather and would be a good way for green newbies to wear a green polish without it being in your face, it's a sophisticated colour :).

So I shall see you all soon with a very unseasonal nail art and possibly a tutorial too ;)

Thursday, 13 September 2012

Pixel nails

So the moment has come, my three days of bending over 5 false nails has finally beared the fruits ;). I was contacted by the amazing Ashley Crowe aka Astrowifey wondering if I would like to contribute to the new magazine that she is starting up this fall. She has contacted loads of talented nail artists to send in painted nails to be featured in the magazine. I couldn't believe that she asked me!! The calibre of nail artists that are going to be featured makes me a bit nervous that my nails won't be good enough, but even if they aren't printed just opportunity was so good and I had a lot of fun!

There were four themes: Geometric/colourblock, black and white, leather and length. So I was going to do one design for leather and one for geometric but the ones I did took so long that I only managed one. I decided to do something I've wanted to for a while and that is pixelated nails. I had a lot of fun coming up with the design and painting them so be kind to me ;).
They took me hours and an awful lot of polish! I painted them with a nail art brush, I could have just painted the background white but then it wouldn't be like pixels so I painstakingly painted each square haha. I hope they get published! That's if they get to America in time.... :O the magazine is called Tipsy Zine so look out for it! They have a tumblr if you want to check it out, it's going to be about nail art and nail art and nail art so it's going to be awesome, I'm hoping I can buy a copy over here!

Tuesday, 11 September 2012

Nails Inc Baker Street swatches

Like I said on saturday I was going shopping and I did indeed acquire the much lusted after Baker street along with the amazing studded booties :D and I got sold Benefit's 'They're Real' mascara and let me tell you, it is soooo good!! I hardly wear any but it makes me lashes look long and curled :). Anyway enough babble onto the polish. I have wanted this one so bad for so long, I was hoping to get it for my birthday but obviously I didn't :( I got mine from a large Boots store, they now have a stand featuring mini Orlys, Nails Inc and Models Own Pro which is pretty cooool.
I put this on saturday night and I still have it on now Tuesday! I'm not getting bored with this colour at all, it's such a lovely colour, I won't go on as you've all seen it a million times before.
 The little hand is this really cool pair of earrings I found in Topshop, I had to get them!! They are so me hehehe
I might have something really cool to tell you soon but we'll see ;).

Seeyou sooooon

Saturday, 8 September 2012

Illamasqua Nomad with nail art x2!

I'm back again and I won't be dissapearing again for a while :) I haven't had the chance to read all the blogs I missed yet but I will!

So to make up for my bad blogging I have two manis to show you woohoo. The first is a very lazy mani, basically I had Stance on both hands and I wanted to try Nomad out so I simply painted it over the top of Stance! I know it's very naughty and lazy but I didn't have time to do a whole paint job ;). I only did this on my left hand though as I really like the colours together. I painted both ring fingers white over the top of stance too, in order to do a quick nail art accent :P.
Here is a weird hand pose as I wanted to show both hands without being boring and whilst on self timer....it's seriously hard!
Nomad is a two coater with lovely formula and is a gorgeous colour, quite accurate in my photos I'd say.
Before I went on holiday I took this off and then repainted all my nails with Nomad again because I really love this colour!
 The index finger is inspired by the amazing nail art by Deco nails for the Insa x nailporn competition, her nails were incredible!! My attempt has gone wrong again :P it's okay I guess but a bit crap in comparison :P. The ring finger was a spine and ribs with a heart but the topcoat killed it :( it smudged all my little bone details :(.
The thumb is by far my favourite :D as you all should know I am obsessed with the crazy talent that is Astrowifey so I decided to pay tribute to her by putting her slogany thing on my thumb 'Go hard in the nail paint' as it should be all of our mottos ;) She actually saw this on instagram and commented on it!! How cool :D.
Everything was done with nail art pens and brushes (which are super hard to use with nail polish! Argh I'm hoping I'll get better with practise)

Bonus picture is of my boyfriend's dog Molly who is kind of my dog too as they got her a couple of months after we got together and we are kind of in love! She's a pedigree and she is the most beautiful doggie ever! But she's super naughty hahahah
 Those eyes! She gets me every time :) and the best part is that I don't have to poop scoop as my nails are too long ;) hahahaha.

Have a good day! I'm off to buy the most amazing studded boots you'll ever see :D and maybe a certain Nails Inc shade.....

Monday, 3 September 2012

Away, again!

Hi everyone, I know I've been a bad blogger lately but it ain't going to improve yet. I completely forgot that I was going to be away for a week with the boyf. I inteded to post from our holiday cottage but there's no Internet access not even on my phone :( I'm only posting this as we are in the car which is the only time I have Internet, stupid rural Cornwall (yep I'm in Cornwall again :P) so I'll see you all in a weeks time and I promise I'll start posting more regularly! I can't even read any blogs at the moment :( so I'll be commenting on the way home most likely :). Have a great week!
 

Abbienail Copyright © 2011 -- Template created by O Pregador -- Powered by Blogger